P: 13th Aug 2015M, Th / 28 Syawal 1436H, Th. [Ubuntu 14.04]
U:
Assalamualaikum warahmatullah. Imagine there are strings and strings of words. In LibreOffice Calc, what i want is for:
(i) one word to go into one cell,
(ii) the word-containing cells to be arranged vertically (instead of horizontally), and
(iii) those word-containing cells to take-up only one column (instead of multiple columns).
That arrangement is useful for word-by-word translating exercise which at the same time preserves the word sequence. So you can either read left-to-right or top-to-bottom. :)
There are three parts to this post:
- Part A: Copy-Paste from source to LibreOffice Calc
- Part B: Transpose in LibreOffice Calc
- Part C: The finished work
If you want to look around, start with Part C.
Part A: Copy-Paste from source to LibreOffice Calc
See Vid 1 which demonstrates Part A and Part B of this post.
1. Select the chunks of text. See Pic 1.
Here's the link to the text in Pic 1:
https://www.facebook.com/zahazanmohamed/photos/10153016171783341/
2. Press the Ctrl+C keyboard keys to copy the chunk of text.
3. Run LibreOffice Calc.
i. Click the Dash Home icon in the Launcher.
ii. In the search field, type in: calc.
iii. Click the LibreOffice Calc icon.
See Pic 2.
The LibreOffice Calc window will appear. See Pic 3.
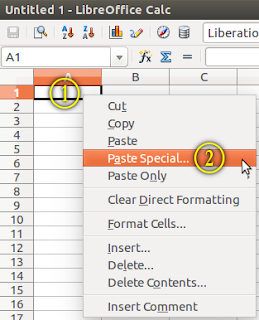
4. Right-click a cell.
In the right-click menu, left click Paste Special... .
See Pic 5.
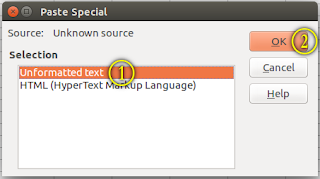
5. In the Paste Special dialog box:
(i) select Unformatted text, then
(ii) click the OK button.
See Pic 6.
6. In the Text Import dialog box:
(i) in the Separator Options section, select Separated by,
(ii) put a tick mark in the appropriate box (in my case: Space), and
(iii) click the OK button.
See Pic 7.
See how the imported text looks in Pic 8.
Part B: Transpose in LibreOffice Calc
Credit for the Transpose info:
http://www.excelforum.com/excel-general/674001-excel-importing-text-file-as-one-long-row.html#post2052280
7. Add a new sheet by clicking the green plus icon. See Pic 9.
The icon is at the bottom of the LibreOffice Calc window, near to the left. See Pic 3.
8. Select the first row of text from Sheet1 (the sheet you used in Step 4).
9. Press the Ctrl+X keyboard keys to cut the row of selected text.
Or if you want to keep the original, you can use Ctrl+C to copy the row of selected text. As i probably don't need the original, i cut the text straightaway.
10. Go to Sheet2 (the sheet you added in Step 7).
11. Right-click a cell where you want the text to start vertically.
In the right-click menu, left click Paste Special... .
See Pic 5.
In my case, i want it to start from cell A2.
12. In the Paste Special dialog box:
(i) in the Options section, put a tick mark in the Transpose box
(ii) then click the OK button.
See Pic 10.
The selected text in Step 8 will be arranged vertically in column A. See Pic 11.
13. Repeat Step 8 to Step 12 for the rest of the text.
Sorry, i don't know how to do it in one go, or automatedly.
Part C: The finished work
The finished work in LibreOffice Calc is shown in Pic 12.
One of the page of the finished work is shown in Pic 13.
The whole document is shown in PDF 1.
Pic 12 - Screenshot of the finished work in LibreOffice Calc.
- Column A: #. Item numbering.
- Column B: Bahasa Arab. The Arabic text.
- Column C: Transliterasi. The transliteration.
- Column D: Bahasa Melayu. The Malay translation.
- Column E: Nota. Notes.
- Column A: #. Item numbering.
- Column B: Bahasa Arab. The Arabic text.
- Column C: Transliterasi. The transliteration.
- Column D: Bahasa Melayu. The Malay translation.
- Column E: Nota. Notes.
Pic 13 - One of the page of the finished work.
The page was converted from PDF to PNG using GIMP.
Refer to PDF 1 for the latest version of the whole document.
The page was converted from PDF to PNG using GIMP.
Refer to PDF 1 for the latest version of the whole document.
PDF 1 - The whole document of the finished work.
Obviously i need to put more effort into my Arabic. (^_^!)
Alhamdulillah.


