Wednesday, June 20, 2012

How to install the Screen Ruler in Ubuntu 11.10 Oneiric Ocelot

24 Rejab 1433H, Kh.

Assalamualaikum. Here i am trying to fix the margins of my thesis according to the guidelines. The required margin measurements are:
- left: at least 40 mm
- top, right and bottom: at least 25 mm

The tricky part is, the page number (which must be positioned at the bottom-center of the page) has to be inside the text area. In other words, the page number is not within the 25 mm bottom-margin area; it must be above/before the bottom margin area.

If it was in LibreOffice Writer that would probably be easy because what-you-see-is-what-you-get. But i'm not using Writer. I'm using Kile where what-you-set-is-what-you-get. So how do i know i've set the measurements correctly?

Here's when i need an onscreen ruler.

Talking about onscreen rulers, if your system runs Ubuntu 11.10 and you go searching for an onscreen ruler in Ubuntu Software Center, among the search results is the KRuler software, see Pic 1. At the moment it measures in pixels (px) only.

Pic 1 - More info on the KRuler software in Ubuntu Software Center.


Some of us might or might not be familiar with the Screen Ruler software because it is available for Ubuntu 11.04 and Ubuntu 12.04 but unavailable for Ubuntu 11.10. More info on Screen Ruler is available in Synaptic Package Manager, see Pic 2.

In Ubuntu Software Center, you need to download then install the package in order to be able to read more info about the Screen Ruler package. See Pic 10.

Pic 2 - More info on the Screen Ruler software in Synaptic Package Manager.


So the whole time i was running Ubuntu 11.10, i didn't have the Screen Ruler... until i found out that i can install it even without the software being listed in Ubuntu Software Center or Synaptic Package Manager.

You might want to sit back and think first whether this installation will pose any risk to your system. Just saying to remind.

Pic 3 shows the version of Screen Ruler in my system. Pic 4 shows the version of my system. Pic 5 shows KRuler and Screen Ruler in action side by side.

Pic 3 - The Screen Ruler version running on my system.


Pic 4 - The Screen Ruler software running on Ubuntu 11.10.


Pic 5 - Screen Ruler in action with KRuler.


If you want Screen Ruler in your Ubuntu 11.10, here's how to install...


1. Go to this webpage, see Pic 6, which is the list of search results from the search term "screenruler":
Ubuntu -- Package Search Results -- screenruler
(http://packages.ubuntu.com/search?keywords=screenruler)

If you want to do your own searching, go here:
Ubuntu -- Ubuntu Packages Search
(http://packages.ubuntu.com/)

Pic 6 - Refer Step 1. The search results for a screen ruler.


2. From the list as seen in Pic 6, choose the package for your system.

Just in case you're new to Ubuntu and somewhat not sure what lucid, natty, precise and quantal mean:
  • Ubuntu 10.04 Lucid Lynx
  • Ubuntu 11.04 Natty Narwhal
  • Ubuntu 12.04 Precise Pangolin
  • Ubuntu 12.10 Quantal Quetzal

I chose this one:
precise (gnome): measure objects on screen with a variety of metrics [universe]
0.960+bzr41-1: all

The link for the package i chose goes here, see Pic 7:
Ubuntu -- Details of package screenruler in precise
(http://packages.ubuntu.com/precise/screenruler)

Pic 7 - Refer Step 2. Details of the Screen Ruler package for Ubuntu 12.04.


3. Referring to Pic 7, in the Download screenruler section, under the Architecture column, click the all link.

You will be taken to the download page, see Pic 8:
Ubuntu -- Package Download Selection -- screenruler_0.960+bzr41-1_all.deb
(http://packages.ubuntu.com/precise/all/screenruler/download)

Pic 8 - Refer Step 3. Choosing the download link.


4. Choose a mirror link then click the link.

The Opening screenruler_### window will appear, see Pic 9. Select the Save File option then click the OK button.

Pic 9 - Refer Step 4. Saving the Screen Ruler package before installing.


5. Once download is complete, open the folder where you saved the downloaded package. If you don't remember where you saved the file, try searching in the Downloads folder.

Double-click the package. Ubuntu Software Center will appear and handle the installation, see Pic 10. Click the Install button to start installing the package into your system.

If the Authenticate window appears, see Pic 11, type-in your password in the Password field then click the Authenticate button. Allow some time for the installation to take place.

You can start using the ruler once installation is completed.

Pic 10 - Refer Step 5. More info about the Screen Ruler package in Ubuntu Software Center.


Pic 11 - Refer Step 5. Authenticating the installation action.


Wassalam.
Tuesday, June 19, 2012

How to do a word count for a PDF file

17 Rejab 1433H, Khamis.

Assalamualaikum. My thesis needed a word count for what could have been its third proofread.

By the way i'm still running Ubuntu 11.10 Oneiric Ocelot. To know why i have not upgraded to Ubuntu 12.04 Precise Pangolin, read here:
My experience upgrading to 12.04 then downgrading to 11.10
(http://ubuntudigest.blogspot.com/2012/04/my-experience-upgrading-to-1204-then.html)

This post and the two previous posts:

were initially meant to be one very looong post. It was so long and covered at least three different things that i didn't know what to put as the title. Hence these three short subsequent posts.

This post refines the word count method mentioned in this thread:
Word Count in PDF file?
(http://ubuntuforums.org/showthread.php?p=5024198#post5024198)


Part A: Installing PDF utilities (based on Poppler)

You will need to install PDF utilities (based on Poppler) before proceeding to Part B.

Pic 1 - PDF utilities in Ubuntu Software Center.


To install...


1. Run Ubuntu Software Center.


2. In the search field, type-in the search term "pdfinfo". The search results will auto-filter. See Pic 2.

Pic 2 - Refer Step 2. Searching for PDF utilities (based on Poppler).


3. Select the PDF utilities (based on Poppler), see Pic 2. Two buttons will auto-appear.

To install, click the Install button.

To read more, click the More Info button, see Pic 2. When ready to install, click the Install button.

Once the software is installed, the Install button will turn into the Remove button.


4. If an Authenticate window like that in Pic 3 appears prompting for your password, key-in your password in the Password field, then click the Authenticate button.

Pic 3 - Refer Step 4. Authenticating the installation.


Part B: Performing a word count for a PDF file

Need i to remind you that i've no idea how accurate the count is.


5. Run the Terminal from the same location as the PDF file. Right-click then select Open in Terminal from the menu. See Pic 4.

Pic 4 - Refer Step 5. Accessing the Terminal from the right-click menu.


If you do not have the Terminal shortcut in your right-click menu, you will need to run the Terminal then change the working directory. Read here how to change the directory:
UsingTheTerminal - Community Ubuntu Documentation
(https://help.ubuntu.com/community/UsingTheTerminal)

To add the Terminal shortcut in the right-click menu, read here:
How to add a Terminal shortcut in the right-click menu
(http://ubuntudigest.blogspot.com/2010/04/how-to-add-terminal-shorcut-in-righ.html)


6. In the Terminal type-in:
pdftotext nameof.pdf - | wc -w -

Source: Re: Word Count in pdf file? #5
(http://ubuntuforums.org/showpost.php?p=5024198&postcount=5)
then press the Enter button. A number will appear below the commandline. See Pic 5.

pdftotext nameof.pdf - | tr -d '.' | wc -w -

Source: Re: Word Count in pdf file? #8
(http://ubuntuforums.org/showpost.php?p=7063843&postcount=8)
then press the Enter button. A number will appear below the commandline. See Pic 5.


To paste into the Terminal, press: Ctrl + Shift + C
To copy from the Terminal, press: Ctrl + Shift + V

Pic 5 - Count. Count. Count.


Roughly, there are 25,109 to 25,120 words in my thesis according to Pic 5. Other methods/ softwares/ online services will produce varying numbers.

Wassalam.

Monday, June 18, 2012

How to rotate, crop, delete and rearrange pages in a PDF file

28 Rejab 1433H, Is.

Assalamualaikum. To remove, rotate, crop and re-arrange pages in a PDF file i use PDF-Shuffler. See Pic 1.


Part A: Installing PDF-Shuffler

You will need to install PDF-Shuffler on your machine first before proceeding to Part B.

Pic 1 - More info on PDF-Shuffler in Ubuntu Software Center.


1. To install, run Ubuntu Software Center.


2. In the search field, type-in the search term "shuffler". The search results will auto-filter. See Pic 2.

Pic 2 - Refer Step 2. Searching for the PDF-Shuffler package in Ubuntu Software Center.


3. Select the PDF-Shuffler package, see Pic 2. Two buttons will automatically appear.

To install, click the Install button. Once the software is installed, the Install button will turn into the Remove button. See Pic 2.

To read more about the package, click the More Info button, see Pic 2. When ready to install, click the Install button.


4. An Authenticate window will appear prompting for your password. Key-in your password in the Password field, then click the Authenticate button. See Pic 3.

Pic 3 - Refer Step 4. Password to allow installation of PDF-Shuffler.


Part B: Manipulating pages in a PDF file

This part will show you how to manipulate pages using PDF-Shuffler.

Pic 4 - The PDF-Shuffler software.


5. Run PDF-Shuffler.


6. To import your PDF file, you can:
(a) use the Import pdf button, see Pic 4, or
(b) simply drag-and-drop your file into PDF-Shuffler.

The imported document will look something like in Pic 5.

Pic 5 - Refer Step 6. Importing the document.


Pic 6 - Refer Step 6. The imported PDF document in PDF-Shuffler.


7. Simply click the page that needs to be modified. To multiple-select pages, hold the Shift button then click-hold-drag to select the pages. Referring to Pic 7, to:

Pic 7 - Refer Step 7. The features available in the right-click menu.


Rotate
Select the page that needs to be rotated, right-click then choose from the menu:
(a) Rotate Page(s) Clockwise, or
(b) Rotate Page(s) Counterclockwise
to rotate the page.

Delete
Select the page that needs to be deleted then:
(a) click the Delete Pages(s) button, or
(b) right-click then choose Delete Page(s) from the menu.

Crop
Select the page that needs to be cropped, right-click then choose Crop Page(s) from the menu.

The Crop Selected Page(s) window appears, see Pic 8. Enter the measurements needed to crop page then click the OK button.

To "uncrop" the cropped page, right-click then choose Crop Page(s) again. In the Crop Selected Page(s) window, change the measurements to zero then click the OK button.

Pic 8 - Refer Step 7. The crop margins.


Rearrange
Select the page that needs to be relocated then click-hold-drag the page to its new location.

Note that the "undo" / "redo" feature is not available in PDF-Shuffler.


8. To "save" your work, click the Export pdf button (refer to Pic 4).

The Export ... window will appear. Select the location and give the file a name then click the Save button (see Pic 8).

Pic 9 - Refer Step 8. Saving the edit.


Wassalam

Sunday, June 17, 2012

How to convert files from PDF to Microsoft Word, online

27 Rejab 1433H, Ah.

Assalamualaikum. For the second proofread, the thesis had to be in a Microsoft Word format which made me do wish it is possible to compile the LaTeX file directly into a Microsoft Word format instead of having to convert file formats. There is a conversion method that uses the Terminal but for reasons i've no idea of, it didn't work for my thesis.

So the file conversion was done online instead. Of the many websites i've tried, this is the one, see Pic 1, i suggest:
Convert PDF to Word
(http://convertpdftoword.net/)

Pic 1 - Screenshot of the website for converting files online, from PDF to Microsoft Word. Convert PDF to Word -- Convert PDF to Doc -- Convert online PDF to Word. (http://convertpdftoword.net/)


Counting from the title page to the last page, the thesis is 115 pages thick at the moment. The main contents (abstract and chapters) are about 60+ pages while the rest are the supporting contents (appendixes, bibliography, etc). In the form of a PDF file, the thesis takes up 20.8 Mb of disk space.

The website managed to convert my bulky document very well. When i opened the converted document in LibreOffice Writer, it looked almost exactly like the original document. The tables were garbled though. I don't know how it will look when opened in Microsoft Word. And the converted file was only 6.9 Mb.

Here's how to convert the file format...


1. Go to the Convert PDF to Word (http://convertpdftoword.net/) website.


2. In my FireFox browser the Choose File button is truncated (see Pic 1) but not in Chromium.

Click the Choose File button. In my case i clicked the field beside the button.

A File Upload window as seen in Pic 2 pops-up.

Pic 2 - Refer Step 2 and Step 3. The File Upload window.


3. In the File Upload window, locate your PDF file. Then click the Open button. See Pic 2.


4. Click the Convert and Download button. See Pic 3.

Leave the website to process (upload and convert) your file. This process might take some time. See Pic 4.

Pic 3 - Refer Step 4. Clicking the Convert and Download button to initiate the upload and file format convertion process.


Pic 4 - Refer Step 4. Processing the document.


5. Once the whole process is finished, click the Download button. See Pic 5.

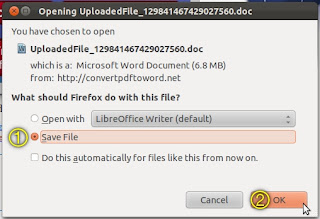
The Opening UploadedFile_###.doc window will appear. See Pic 6.

Pic 5 - Refer Step 5. Downloading the converted file.


6. In the Opening UploadedFile_###.doc window, select the Save File option, then click the OK button. See Pic 6.

Pic 6 - Refer Step 6. Saving the converted file.


7. Once the download is completed, open the converted file in LibreOffice Writer to check and see the results.


Wassalam.