Created: 14th March 2013M / 3 Jamadilawal 1434H, Fr. [Ubuntu 12.04 Precise Pangolin]
Published: 15th March 2013M / 3 Jamadilawal 1434H, Fr.
Updated:
Assalamualaikum.
After creating the Bunga in Blender, see this post:
Bunga Blender
http://ubuntudigest.blogspot.com/2013/03/bunga-blender.html
... I went on to try create the letter Dad in Blender. Dad is the 15-th letter of the Arabic alphabet and the 16-th letter of the Jawi alphabet. The early result looked like a letter made of modelling clay, see Pic 1.
To create a better-looking letter, I thought of importing a file then tracing the letter but some how couldn't import the SVG file into Blender and didn't know why.
After watching this tutorial:
Blender Tutorial Import .svg file from Inkscape, Edit, Apply Texture, & Export 3d Image
http://youtu.be/jD0MBYmnJSk
... I realized that my mistake was I tried to import text instead of path. The text has to be converted to a path first, and then can it be imported into Blender. Referring to Pic 2, in Inkscape, select the object (text) then go to Path > Object to Path.
Using the Edit path by nodes cursor (see Pic 3), click the now-path object. The outline of the now-path object should have nodes like that in Pic 4 .
Shown in Pic 5 is the imported SVG Dad after some rotating, scaling and texturing. Shown in Pic 6 and Pic 7 are the final results of Pic 5.
Between Pic 6 and Pic 7:
- Pic 6 has a thicker extrusion and dimmer lighting
- Pic 7 has a thinner extrusion and brighter lighting.
More about Blender, here:
blender.org
http://www.blender.org/
More about Inkscape, here:
Inkscape. Draw Freely .
http://inkscape.org/
Alhamdulillah. Wassalam.
Showing posts with label Inkscape Vector Graphics Editor. Show all posts
Friday, March 15, 2013
Saturday, August 18, 2012
How to setup the Squiggle browser + add an underline in Inkscape
21 Ramadan 1433H, Ju.
Assalamualaikum warahmatullah. Bismillahirahmanirahim.
Remember the Polaroid frame created using Inkscape Vector Graphics Editor? Read the post here:
Creating a Polaroid frame using Inkscape Vector Graphics Editor
(http://ubuntudigest.blogspot.com/2012/07/creating-polaroid-frame-using-inkscape.html)
I'm using the vector Polaroid frame for a mini project. In the project, some letters need to have an underline. As Inkscape does not provide an underline button, i thought of using underlined fonts instead. The DejaVu Sans font for example has some letters with underlines -- good, except that the letters i need aren't that some letters.
The simple trick of adding a horizontal line under the letters to act as the underline is a temporary workaround which can make the work tedious if the text is edited multiple times.
An online search will turn-up:
- many questions about how to add these underlines,
- some bug reports, and
- a way to add that underline.
The "missing" underline feature has already been reported. See the filed reports here:
- Bug #172133 (sf1796218): Implement SVG text-decoration - underline, strikethrough, etc. (17th Sep 2007)
(https://bugs.launchpad.net/inkscape/+bug/172133)
- Question #90194: Questions: Inkscape: underline text (14th Nov 2009) (https://answers.launchpad.net/inkscape/+question/90194)
The how-to-add-underline is taught here:
Inkscape: Guide to a Vector Drawing Program > Examples > Underlined Text
(http://tavmjong.free.fr/INKSCAPE/MANUAL/html/XML-Examples.html#XML-Examples-UnderlinedText)
which is also the first time i read about the Squiggle browser, see Pic 10. The webpage mentions that:
- Inkscape does not have an underline button to accompany the bold-normal weight button (see Pic 1) and italic-oblique style button (see Pic 2).
- The underline has to be added "manually" in Inkscape.
Detailed steps are shown in Part E of this blog post.
- Even if an underlined text does exist in the SVG file (i.e., an SVG file imported from Wikipedia), Inkscape will display the text without the underline.
It might or might not be worth mentioning that i'm still using Ubuntu 11.10 Oneiric Ocelot even though Ubuntu 12.04 Precise Pangolin is available.
Part A: Installing the OpenJDK Development Kit package
The OpenJDK Development Kit package, see Pic 3, is installed as mentioned in the Apache Batik website:
Make sure a Java Development Kit (JDK) is installed on the computer where Batik will be installed.
Source: Installing Batik > Choosing a distribution to download
http://xmlgraphics.apache.org/batik/install.html#distributions
Any attempt to launch the Squiggle browser without a Java Development Kit (JDK) installed will give you a "notification" like in Pic 4.
Pic 4 - Launching the Squiggle browser without a Java Development Kit (JDK) installed -- unsuccessful.
1. Run Ubuntu Software Center.
2. In the search field, type-in the search term:
java development kitThe search results will auto-filter. See Pic 5.
3. Click on the package, see Pic 5:
OpenJDK Development Kit (JDK)
openjdk-7-jdk
The More info button and Install button will appear.
4. To read a short summary about the package or see the list of offered Add-ons as shown in Pic 3, click the More info button.
- To install the add-ons, put a tick in the box next to the add-ons.
Then click the Apply changes button. - The Authenticate window, see Pic 6, will appear.
Type-in your password in the Password field.
Then click the Authenticate button. - Give the download and install process some time to complete.
To install straight away, click the Install button.
- The Authenticate window, see Pic 6, will appear.
Type-in your password in the Password field.
Then click the Authenticate button. - Give the download and install process some time to complete.
Once the download and install process is completed, Ubuntu Software Center can be closed.
Note-1: The xml.apache.org SVG Library package in Ubuntu Software Center
In Ubuntu Software Center, if you search using the search term "squiggle", there is one search result, see Pic 7:
xml.apache.org SVG Library
libbatik-java
After some try-and-error, not only do i not know how to use this package, i am thinking that this package is the source of the "access denied" error, see Note-2. Thus i have removed the installed package from my system after having success with Part B.
If you're in doubt, go find some more information to be sure.
Pic 7 - Refer to Note-1. Summary of the xml.apache.org SVG Library package in Ubuntu Software Center.
Note-2: The access denied error from the Squiggle browser
There are reports and forum threads about the "access denied" error. The error appears in the ERROR window, see Pic 8:
Note-2: The access denied error from the Squiggle browser
There are reports and forum threads about the "access denied" error. The error appears in the ERROR window, see Pic 8:
SVG Error:
access denied ("java.io.FilePermission" "/usr/share/java/batik-squiggle-1.7.jar" "read")
After tweaking around, i think the possible reason for this error is the directory from which the Squiggle browser is launched. i could still be wrong though. Compare the directory in Pic 8 with Pic 15.
The workaround for the problem is explained in Part B.
Part B: How to "install" and run the Squiggle browser
The Squiggle browser, see Pic 10, was built specially for displaying SVG files. Read here for more information about the browser:
Squiggle, the SVG Browser
http://xmlgraphics.apache.org/batik/tools/browser.html
5. Download the Batik toolkit, here:
Download Batik > Download a distribution
http://xmlgraphics.apache.org/batik/download.cgi#Download+a+distribution
i chose the:
Binary distribution for JRE 1.4+and downloaded the toolkit zip file into my Downloads folder. In the downloaded toolkit is Squiggle, the SVG browser.
batik-1.7.zip
So, what is Batik?
Batik is a Java-based toolkit for applications or applets that want to use images in the Scalable Vector Graphics (SVG) format for various purposes, such as display, generation or manipulation.
Source: Batik SVG Toolkit > Overview
http://xmlgraphics.apache.org/batik/#overview
A brief description about the tools in the toolkit is provided here:
About the tools
http://xmlgraphics.apache.org/batik/tools/index.html
6. Open the Downloads folder.
Right-click anywhere in the folder, see Pic 11.
In the right-click menu choose Open in Terminal.
7. Unpack (extract) the toolkit by typing into the Terminal this command, see Pic 12:
jar xvf batik-1.7.zipThen press the Enter button.
Source: Installing Batik > Choosing a distribution to download
(http://xmlgraphics.apache.org/batik/install.html#distributions)
A new folder named batik-1.7 will be automatically created in the Downloads folder. See Pic 13.
By the way:
- the keyboard shortcut to paste into the Terminal is: Ctrl+Shift+V
- the keyboard shortcut to copy from the Terminal is: Ctrl+Shift+C
Pic 13 - Refer to Step 7. The new folder, batik-1.7, is created in the Downloads folder after unpacking the batik-1.7.zip file.
8. Open the batik-1.7 folder.
Right-click anywhere in the folder, see Pic 14.
In the right-click menu choose Open in Terminal.
9. Run the Squiggle browser by typing into the Terminal this command, see Pic 15:
java -jar batik-squiggle.jar
Source: Squiggle, the SVG browser > Starting the browser > Starting the browser for the binary distribution
(http://xmlgraphics.apache.org/batik/tools/browser.html#starting-binary)
The browser should open without any "access denied" error.
The splash screen, see Pic 9, will appear first followed by the browser, see Pic 10.
Note-3: Running the Squiggle browser, next time
The next time you need to run Squiggle, simply follow Step 8 and Step 9.
Part C: Viewing an SVG file in the Squiggle browser
10. Supposing you don't have any SVG files at the moment, go download any SVG file from Wikipedia. Skip this step if you already have an SVG file.
10.1. I used this file:
Fail:Jenis darah ABO.svg - Wikipedia Bahasa Melayu, ensiklopedia bebas
(http://ms.wikipedia.org/wiki/Fail:Jenis_darah_ABO.svg)
For the English version:
File:ABO blood type.svg - Wikipedia, the free encyclopedia
(http://en.wikipedia.org/wiki/File:ABO_blood_type.svg)
10.2. Click anywhere on the file ("picture").
The URL of the webpage will be something like this:
http://upload.wikimedia.org/wikipedia/commons/a/a0/Jenis_darah_ABO.svg
10.3. Depending on your Internet browser, click File > Save Page As... . See Pic 17.
The Save As window will appear. See Pic 18.
10.4. In the Save As window, give the file a location then click the Save button. See Pic 18.
i saved the file in my Downloads folder.
11. Run the Squiggle browser. See Note-3.
12. In the Squiggle browser, click File > Open File... . See Pic 19.
The Open window will appear. See Pic 20.
13. In the Open window, see Pic 20:
13.1. In the Look in section, navigate to the folder containing the SVG file.
13.2. Select the SVG file.
13.3. Then click the Open button.
The SVG file will be loaded in Squiggle. See Pic 16.
Part D: How to export (convert formats) using the Squiggle browser
14. Continuing directly from Step 13.
Click File > Export As >
- PNG...
- JPEG...
- TIFF...
14.1. Say, you are exporting the SVG file as a PNG file.
Click File > Export As > PNG... . See Pic 21.
The Export as PNG window will appear. See Pic 22.
In the Export as PNG window:
- give the file a location, and
- a name.
The Write 256 color PNG? window will appear. See Pic 23.
- To accept the change, put a tick in the box then click the OK button.
- To not accept the change, click the OK button.
Check the PNG file in the folder.
14.2. Say, you are exporting the SVG file as a JPEG file.
Click File > Export As > JPEG... . See Pic 21.
The Export as JPG window will appear. See Pic 24.
In the Export as JPG window:
- give the file a location, and
- a name.
The JPEG Quality window will appear. See Pic 25.
In the JPEG Quality window, slide the slider to a number to choose the quality of the JPEG file. Then click the OK button.
Check the JPEG file in the folder.
14.3. Say, you are exporting the SVG file as a TIFF file.
Click File > Export As > TIFF... . See Pic 21.
The Export as TIFF window will appear. See Pic 26.
In the Export as TIFF window:
- give the file a location, and
- a name.
Check the TIFF file in the folder.
Part E: How to add an underline in Inkscape
Pic 27 - Comparing how the SVG file is displayed. The "la" in Selamat and the first "i" in Aidilfitri is underlined which are displayed correctly in the Squiggle browser and Chromium browser.
- Top-left: Image Viewer.
- Top-right: Squiggle browser.
- Bottom-left: Chromium browser.
- Bottom-right: Mozilla Firefox browser.
Selamat Hari Raya Aidilfitri loosely translates as Happy Great Day of Eid ul-Fitr.
Maaf Zahir dan Batin loosely translates as Sorry Physically and Spiritually.
Malay (Bahasa Melayu) --> English
- selamat -- happy / safe
- hari -- day
- raya -- big / grand day / public / common
- Aidilfitri -- Eid ul-Fitr
- maaf -- sorry / apologize
- zahir -- corporeal / physically
- dan -- and
- batin -- incorporeal / spiritually
This might be a worthy read by the way:
Text -- SVG 1.1 (Second Edition)
(http://www.w3.org/TR/SVG/text.html)
15. Run Inkscape Vector Graphics Editor.
16. Click the Text Tool icon, see Pic 28, which is in the left-hand side toolbar.
17. Click the cursor on the canvas to add text. Then type-in/paste your text.
Do not click-hold-drag as a way to add text. See Note-4.
18. This step is done as taught here:
Inkscape: Guide to a Vector Drawing Program > Examples > Underlined Text
(http://tavmjong.free.fr/INKSCAPE/MANUAL/html/XML-Examples.html#XML-Examples-UnderlinedText)
18.1. Highlight the text that needs an underline.
18.2. Change the color of the selected text by simply clicking a color in the row of colors at the bottom of the window. This change-color step is temporary.
The purpose of this step is to create the <svg:tspan> tag in the XML Editor, which is the easiest way to do. See Pic 30.
18.3. Open the XML Editor.
Click Edit > XML Editor... . See Pic 29.
The XML Editor (Shift+Ctrl+X) window will appear. See Pic 30.
18.4. In the XML Editor (Shift+Ctrl+X) window, see Pic 30, expand the <svg:text> node by clicking on the small triangle.
Expand the <svg:tspan> nodes below it to look for the to-be-underlined text.
When you've found the to-be-underlined text, click its <svg:tspan> node.
Then click the style Attribute in the upper window.
Add this to the style Value in the lower window:
text-decoration: underline
Press the Ctrl+Enter button to apply the changes.
Close the XML Editor window.
18.5. After you are done editing, save the file as Plain SVG.
Click File > Save As... . See Pic 31.
The Select file to save to window will appear. See Pic 32.
In the Select file to save to window, give the file:
- a name
- a location
- the Plain SVG (*.svg) format
18.6. View the Plain SVG file in Squiggle, refer to Part C. See Pic 27.
Note-4: Black rectangles instead of text in Inkscape
Look at the icon of your SVG file. If your text turns out as black rectangles in the icon, you will need to change your text-adding technique.
Click-hold-drag to create a text area will give black rectangles the size of the text area itself.
Simply click and type-in the text instead. Let the area automatically adjust itself while typing.
The black rectangles effects:
- the icons of the SVG files, and
- viewing SVG files in Squiggle
Part F: Validating your Plain SVG file
So you have created an SVG file and want to share it on the Internet, say, Wikipedia. Although the file is displayed error-free in Squiggle it is best to validate (i.e., check for errors) the Plain SVG file before uploading. Go here, see Pic 33:
The W3C Markup Validation Service > Validate by file upload
(http://validator.w3.org/#validate_by_upload)
If you get a green, see Pic 34, the file is [Valid]. This means the file is ready to be shared.
If you get a red, see Pic 35, the file is [Invalid]. This means there are errors in the file which needs to be corrected.
If you get a red but are confident that it should be a green, do a bug search to confirm. This is one of the known bugs about the validator:
[Bug 16272] New: Use of foreign namespace in SVG marked as invalid. (8th Mar 2012)
(http://lists.w3.org/Archives/Public/www-validator-cvs/2012Mar/0017.html)
Wassalam.
Monday, July 16, 2012
Creating a Polaroid frame using Inkscape Vector Graphics Editor
Updated: 20 Ramadan 1433H / 9th August 2012M, Kh.
5 Ramadan 1433H / 24th July 2012M, Ra.
Assalamualaikum. This was an attempt to create a vector Polaroid frame using the Inkscape Vector Graphics Editor software. The results are shown in Pic 1, Pic 2 and Pic 3.
Encik = Mr.
Semut = ant
Puan = Mrs.
Bunga = flower
A raster Polaroid frame guide has already been created some time ago. See this post:
Polaroid frame effect using GIMP
(http://ubuntudigest.blogspot.com/2010/05/polaroid-frame-effect-using-gimp.html)
Part A: Installing the Inkscape Vector Graphics Editor software
1. Run Ubuntu Software Center.
2. In the search field, type in the search term:
3. Click on the Inkscape Vector Graphics Editor package.
Two buttons will appear, the More Info button and the Install button. See Pic 5.
To read more about the package and the available add-ons, click the More Info button. When ready to install, click the Install button.
To install straightaway, click the Install button.
4. The Authenticate window will appear prompting for your password to authenticate the installation action.
Type-in your password in the Password field, then click the Authenticate button.
Depending on your Internet connection, allow time for the package to be downloaded then installed into your system.
5. The Ubuntu Software Center window can be closed once the installation process is completed.
Part B: Creating a vector Polaroid frame
The measurements used are according to the dimensions of the Spectra Polaroid. See here:
Polaroid frame effect using GIMP
(http://ubuntudigest.blogspot.com/2010/05/polaroid-frame-effect-using-gimp.html)
6. Run Inkscape Vector Graphics Editor.
7. To set the canvas size, go to File > Document Properties... . See Pic 8.
The Document Properties (Shift+Ctrl+D) window will appear. See Pic 9.
In the window, on the Page tab, in the Custom size section, set the:
At 100% zoom, the canvas will look like Pic 10.
8. Save the work by clicking File > Save As... .
The Select file to save to window will appear. See Pic 11.
In the window:
For the succeeding saves, use File > Save or simply use the Ctrl+S keyboard shortcut. Make saving your work frequently a habit. The easiest is to save after completing each Step -- right before proceeding to the next Step.
See here for more shortcuts:
Inkscape keys and mouse reference
(http://inkscape.org/doc/keys045.html)
9. By default, the current layer you see on the canvas is named Layer 1. Lets rename this layer.
Method 1
9.1. Click Layer > Layers... . See Pic 12.
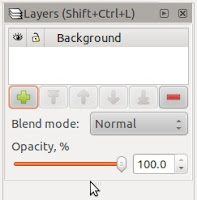
The Layers (Shift+Ctrl+L) dialog, see Pic 13, will appear on the right-hand side of the Inkscape window.
9.2. In the Layers (Shift+Ctrl+L) dialog, right-click the layer that needs to be renamed.
In the right-click menu select the Rename Layer... . See Pic 14.
The Rename Layer window will appear. See Pic 15.
9.3. In the window, see Pic 15:
Method 2
9.4. Follow Step 9.1.
9.5. In the Layers (Shift+Ctrl+L) dialog, see Pic 13, simply click on the layer's name to rename.
Then rename the layer.
Press the Enter button or click anywhere to accept the name change.
Press the Esc button to cancel the change.
Method 3
9.6. To rename the currently active layer, go to Layer > Rename Layer... . See Pic 16.
9.7. The Rename Layer window will appear. See Pic 17.
In the window:
10. Creating the Polaroid frame.
10.1. Create a new layer by clicking Layer > Add Layer... . See Pic 18.
The Add Layer window will appear. See Pic 19.
In the window:
10.2. Click the Rectangle tool icon in the left-hand side vertical toolbar. See Pic 20.
Create a rectangle on the canvas. I'll refer to this rectangle as Rectangle-1. See Pic 22.
Use the the Controls bar (the horizontal toolbar at the top of the Inkscape window) to set the dimensions of the Rectangle-1.
I set the dimension as, see Pic 21:
Press the Esc button to cancel the change.
11. To give Rectangle-1 some color make sure the Polaroid frame layer is active. Check the Layers (Shift+Ctrl+L) dialog.
11.1. Right-click Rectangle-1. In the right-click menu, select the Fill and Stroke. See Pic 22.
The Fill and Stroke (Shift+Ctrl+F) dialog, see Pic 23, will appear on the right-hand side of the Inkscape window.
Referring to Pic 23, select the Fill tab, then click the Linear gradient icon. A horizontal line (we will get back to this line in Step 12) will appear in the center of Rectangle-1, see Pic 28. Click the Edit... button.
The Gradient editor window will appear. See Pic 24.
11.2. Creating the very light gray stop.
In the Gradient editor window, in the Stop Color section, under the RGB tab, type-in:
e3e1e1 would be the hex (hexadecimal) color while ff would be the opacity (alpha).
Then click the Add stop button. See Pic 24.
11.3. Creating the white stop.
Still in the Stop Color section, under the RGB tab, type-in:
Then click the Add stop button. See Pic 25.
11.4. Deleting stops.
Still in the The Gradient editor window, check the drop-down menu for stops other than those mentioned in Step 11.2 and Step 11.3.
To delete those extra stops, click that extra stop in the drop-down menu. Then click the Delete stop button. See Pic 26.
You should have only two stops in the drop-down menu by the end of this step. See Pic 27.
The Gradient editor window can be closed when done.
To convert colors, see here:
Color converter - HEX to RGB and rgb to hex color converter
(http://www.yellowpipe.com/yis/tools/hex-to-rgb/color-converter.php/)
11.5. Take note that we want the color to come from only the fill and that nothing comes from the stroke (outline).
Go to the Stroke paint tab and make sure the No paint icon is selected.
12. About the horizontal line mentioned in Step 11, see Pic 28.
If you don't see the line, make sure to select the Rectangle tool icon, see Pic 20, then click Rectangle-1.
The horizontal line (gradient line?) is used to control the direction of the gradient. Move the handles and you move the direction of the gradient.
Click-hold-drag the small square handle (start of linear gradient) of the horizontal line to the upper-left-hand side of the square.
Click-hold-drag the small circle handle (end of linear gradient) of the horizontal line to the lower-right-hand side of the square.
Move the handles around to get the gradient effect you want. Just switch the handles around if your handles do not match mine like in Pic 29. Or feel free to do it anyway you like :)
13. Creating the photo area.
A new rectangle, namely Rectangle-2, will be created on top of Rectangle-1. See Pic 31.
Using Rectangle-2 as a "cookie cutter", a hole will be cut out in Rectangle-1.
The hole will be the photo area.
13.1. Click the Rectangle tool icon, see Pic 20.
Create Rectangle-2 on top of Rectangle-1.
In the Controls bar, set the dimensions of Rectangle-2 as, see Pic 30:
Change the color of Rectangle-2 for better contrast if you need to. See Pic 31.
13.2. Creating a hole the size of the photo area.
Select both rectangles either by
Go to Path > Difference. See Pic 32.
A cut will be made instantaneously. See Pic 33.
14. Creating the drop shadow.
14.1. Take note that the Polaroid frame and the drop shadow will be automatically combined together permanently. It might be a good idea to make a duplicate of the Polaroid frame before proceeding further to avoid having to create the frame repeatedly. See Point D, Point E and Point F.
Right-click the Polaroid frame layer in the Layers (Shift+Ctrl+L) dialog. See Pic 34.
In the right-click menu select Duplicate Current Layer.
A new layer with the word "copy" at the end of the name will be created. See Pic 38.
Click the eye icon to show or hide the layer.
Click the padlock icon to lock or unlock the layer.
14.2. Go to Filters > Shadows and Glows > Drop Shadow... . See Pic 35.
The Drop Shadow window will appear. See Pic 36.
In the window, set as:
Put a tick in the Live preview box to see instantly the effect of the drop shadow settings. Then click the Apply button to apply the drop shadow effect.
15. Creating the secondary frame (the frame outside the Polaroid frame).
15.1. Create a new layer for the secondary frame. See Step 10.1.
In the Add Layer window, see Pic 37:
At the moment this is the order of the layers in the Layers (Shift+Ctrl+L) dialog, see Pic 38:
The layers can be rearranged by being raised or lowered using the buttons at the bottom of the Layers (Shift+Ctrl+L) dialog.
15.2. Create a new rectangle, namely Rectangle-3, on the outside Polaroid frame layer.
Using the Controls bar, make Rectangle-3 to this size, see Pic 39:
15.3. To center Rectangle-3 on the canvas, go to Object > Align and Distribute... . See Pic 40.
The Align and Distribute (Ctrl+Shift+A) dialog will appear on the right-hand side of the Inkscape window.
Select everything on the canvas.
In the Align and Distribute (Ctrl+Shift+A) dialog, under the Align section, see Pic 41:
(i) Relative to:Smallest object Page
(ii) click the Center on vertical axis icon
(iii) click the Center on horizontal axis icon
15.4. Changing the color and opacity of Rectangle-3.
Right-click Rectangle-3. In the right-click menu click the the Fill and Stroke. See Step 11 and Pic 22.
In the Fill and Stroke (Ctrl+Shift+F) window, on the Fill tab, make sure to select the Flat color icon. See Pic 42.
In the Flat color section, on the RGB tab type-in:
15.5. The photo area needs to be cutout, again, this time for Rectangle-3.
Simply repeat Step 13 because this step is similar to that step.
Change the colors of Rectangle-2 for better contrast if you need to.
Press the Shift button to multiple-select Rectangle-3 and Rectangle-2.
By the end of this step the frame will look something like Pic 43.
16. Enlarging the canvas to include Rectangle-3.
Click Rectangle-3.
Go to File > Document Properties... . See Pic 8.
The Document Properties (Ctrl+Shift+D) window will appear. See Pic 44.
On the Page tab, under the Custom size section, expand the Resize page to content... by clicking on the small triangle beside it.
Click the Resize page to drawing or selection button.
After clicking, the canvas size will automatically change to:
Close the Document Properties (Ctrl+Shift+D) window.
17. Placing the caption.
17.1. Just so we don't mess up anything in case something goes wrong, we will give the caption its very own layer. We will put the caption layer on the topmost of the layers.
Click the Polaroid frame layer in the Layers (Shift+Ctrl+L) dialog.
Then go to Layer > Add Layer... . See Pic 17.
The Add Layer window will appear.
In the window, see Pic 45:
The arrangement of layers in the Layers (Shift+Ctrl+L) dialog at the moment is shown in Pic 46.
17.2. To add the text, click the Text tool icon, see Pic 47, which is in the left-hand side toolbar.
Click-hold-drag to create a text field in the lower part of the Polaroid frame.
=======
Update: 20 Syawal 1433H / 6 Sep 2012, Ju.
The Controls bar will turn into the text-formatting toolbar where you can change the properties of the text.
Type-in your text in the text field.
Adjust the text properties (text field, text type, text size and text alignment) to your taste.
I used, see Pic 47:
To edit the text, you can also go to Text > Text and Font... . See Pic 49.
The Text and Font (Ctrl+Shift+T) window will appear. See Pic 50.
17.3. Changing the font color.
Method 1
(i) Using the Text tool, highlight the text.
(ii) At the bottom of the Inkscape window, right-click the color you want then select Set fill. See Pic 51.
If you want to give color to the outline of the text, select Set stroke instead.
Method 2
You can also use the Fill and Stroke (Ctrl+Shift+F) dialog. See Pic 23.
Go to the Fill tab to set the fill color.
Go to the Stroke tab to set the outline color.
18. A layer specially for the photo.
Method 1
In the Layers (Ctrl+Shift+L) dialog, click the Background layer to activate it (make it the current layer).
Then go to Layer > Add Layer... . See Pic 18.
In the Add Layer window, see Pic 52:
This should be the final arrangement of the layers in the Layers (Ctrl+Shift+L) dialog, see Pic 53:
Method 2
If you do not want an extra layer, you can rename the Background layer to Photo here layer instead.
Simply click the layer's name in the Layers (Ctrl+Shift+L) dialog and rename.
Part C: How to use the frame
A. Importing a photo.
A.1. Click the Photo here layer in the Layers (Ctrl+Shift+L) dialog to activate it.
A.2. Go to File > Import... . See Pic 54.
The Select file to import window will appear. See Pic 55.
In the window, locate the photo then click the Open button.
Similarly you can simply drag-and-drop the photo onto the canvas.
In my case, the jpeg GDK pixbuf Input window appeared. See Pic 56.
For the:
Depending on the photo size, the importing process might take a few minutes.
A.3. Once the photo is on the canvas, to resize the photo proportionally, press the Ctrl button, then click-hold-drag one of the handles of the photo to resize.
Pressing the Shift button will resize the photo along the axis corresponding to that particular handle.
B. To edit the caption, click the Text tool icon then click the text field on the canvas. See Step 17.2.
C. To save the file in another format (PNG).
C.1. When you are done editing and ready to export your work, go to File > Export Bitmap... . See Pic 57.
The Export Bitmap (Ctrl+Shift+E) window will appear. See Pic 58.
C.2. In the Export Bitmap (Ctrl+Shift+E) window:
(i) under the Export area section, click the Page button. See Pic 58.
Regarding the:
(ii) Under the Bitmap size section, increase or decrease the size of the resulting document if you need to. Otherwise proceed straight to Step C.2.iii.
(iii) Under the Filename section, click the Browse button. See Pic 58.
The Select a filename for exporting window will appear. See Pic 59.
In the window, give the file a name and location. Then click the Save button. The window will disappear.
(iv) Then click the Export button. See Pic 59.
The file will be saved using the PNG format.
D. To save the Polaroid frame + drop shadow + outside Polaroid frame. The result will look something like Pic 1.
D.1. Make sure at least the:
D.2. Then follow Step C.
In Step C.2.iii, click the Page button.
E. To save the Polaroid frame + drop shadow -- outside Polaroid frame. The result will look something like Pic 2.
E.1. Make sure at least the:
E.2. Activate the Polaroid frame layer.
On the canvas, select the Polaroid frame.
E.3. Then follow Step C.
In Step C.2.iii, click the Selection button.
F. To save the Polaroid frame -- drop shadow -- outside Polaroid frame. The result will look something like Pic 3.
F.1. Make sure at least the:
F.2. Activate the Polaroid frame copy layer.
On the canvas, select the Polaroid frame.
F.3. Then follow Step C.
In Step C.2.iii, click the Selection button.
Wassalam.
17 Syaaban 1433H, Sa.
Assalamualaikum. This was an attempt to create a vector Polaroid frame using the Inkscape Vector Graphics Editor software. The results are shown in Pic 1, Pic 2 and Pic 3.
Pic 1 - Refer to Step D. Bunga-1. Encik Semut & Puan Bunga = Mr. Ant & Mrs. Flower.
Polaroid frame + outside Polaroid frame + drop shadow.
Encik = Mr.
Semut = ant
Puan = Mrs.
Bunga = flower
A raster Polaroid frame guide has already been created some time ago. See this post:
Polaroid frame effect using GIMP
(http://ubuntudigest.blogspot.com/2010/05/polaroid-frame-effect-using-gimp.html)
Part A: Installing the Inkscape Vector Graphics Editor software
Pic 4 - More info on the Inkscape Vector Graphics Editor package as shown in Ubuntu Software Center.
1. Run Ubuntu Software Center.
2. In the search field, type in the search term:
inkscapeThe search results will auto-filter as you type. See Pic 5.
3. Click on the Inkscape Vector Graphics Editor package.
Two buttons will appear, the More Info button and the Install button. See Pic 5.
To read more about the package and the available add-ons, click the More Info button. When ready to install, click the Install button.
To install straightaway, click the Install button.
4. The Authenticate window will appear prompting for your password to authenticate the installation action.
Type-in your password in the Password field, then click the Authenticate button.
Depending on your Internet connection, allow time for the package to be downloaded then installed into your system.
5. The Ubuntu Software Center window can be closed once the installation process is completed.
Part B: Creating a vector Polaroid frame
The measurements used are according to the dimensions of the Spectra Polaroid. See here:
Polaroid frame effect using GIMP
(http://ubuntudigest.blogspot.com/2010/05/polaroid-frame-effect-using-gimp.html)
6. Run Inkscape Vector Graphics Editor.
7. To set the canvas size, go to File > Document Properties... . See Pic 8.
The Document Properties (Shift+Ctrl+D) window will appear. See Pic 9.
In the window, on the Page tab, in the Custom size section, set the:
- Units: in
- Width: 4.00
- Height: 4.13
At 100% zoom, the canvas will look like Pic 10.
8. Save the work by clicking File > Save As... .
The Select file to save to window will appear. See Pic 11.
In the window:
- Give the file a name in the Name field.
- Save the file somewhere. I put it on the Desktop. (As of 9th August 2012M, i noticed that i've accidentally deleted the file ><)
- Make sure the format for the file is Inkscape SVG (*.svg).
For the succeeding saves, use File > Save or simply use the Ctrl+S keyboard shortcut. Make saving your work frequently a habit. The easiest is to save after completing each Step -- right before proceeding to the next Step.
See here for more shortcuts:
Inkscape keys and mouse reference
(http://inkscape.org/doc/keys045.html)
9. By default, the current layer you see on the canvas is named Layer 1. Lets rename this layer.
Method 1
9.1. Click Layer > Layers... . See Pic 12.
The Layers (Shift+Ctrl+L) dialog, see Pic 13, will appear on the right-hand side of the Inkscape window.

Pic 13 - Refer to Step 9.1. The Layers (Shift+Ctrl+L) dialog.
9.2. In the Layers (Shift+Ctrl+L) dialog, right-click the layer that needs to be renamed.
In the right-click menu select the Rename Layer... . See Pic 14.
The Rename Layer window will appear. See Pic 15.

Pic 14 - Refer to Step 9.2. Right-click menu.
9.3. In the window, see Pic 15:
- Change the Layer name from Layer 1 to Background.
Method 2
9.4. Follow Step 9.1.
9.5. In the Layers (Shift+Ctrl+L) dialog, see Pic 13, simply click on the layer's name to rename.
Then rename the layer.
Press the Enter button or click anywhere to accept the name change.
Press the Esc button to cancel the change.
Method 3
9.6. To rename the currently active layer, go to Layer > Rename Layer... . See Pic 16.
9.7. The Rename Layer window will appear. See Pic 17.
In the window:
- Change the Layer name from Layer 1 to Background.
10. Creating the Polaroid frame.
10.1. Create a new layer by clicking Layer > Add Layer... . See Pic 18.
The Add Layer window will appear. See Pic 19.
In the window:
- Name the layer as Polaroid frame in the Layer name field.
- Make sure the new layer is Above current in the Position field.
10.2. Click the Rectangle tool icon in the left-hand side vertical toolbar. See Pic 20.
Create a rectangle on the canvas. I'll refer to this rectangle as Rectangle-1. See Pic 22.
Use the the Controls bar (the horizontal toolbar at the top of the Inkscape window) to set the dimensions of the Rectangle-1.
I set the dimension as, see Pic 21:
- X: 0.000 in
- Y: 0.000 in
- Make sure the padlock is unlocked.
- W: 4.000 in
- H: 4.125 in
Press the Esc button to cancel the change.
11. To give Rectangle-1 some color make sure the Polaroid frame layer is active. Check the Layers (Shift+Ctrl+L) dialog.
11.1. Right-click Rectangle-1. In the right-click menu, select the Fill and Stroke. See Pic 22.
The Fill and Stroke (Shift+Ctrl+F) dialog, see Pic 23, will appear on the right-hand side of the Inkscape window.
Referring to Pic 23, select the Fill tab, then click the Linear gradient icon. A horizontal line (we will get back to this line in Step 12) will appear in the center of Rectangle-1, see Pic 28. Click the Edit... button.
The Gradient editor window will appear. See Pic 24.
Pic 22 - Refer to Step 11.1. Accessing the fill and stroke properties of Rectangle-1. Rectangle-1 is the Polaroid frame.
11.2. Creating the very light gray stop.
In the Gradient editor window, in the Stop Color section, under the RGB tab, type-in:
- R: 227
- G: 225
- B: 225
- A: 255
- RGBA: e3e1e1ff
e3e1e1 would be the hex (hexadecimal) color while ff would be the opacity (alpha).
Then click the Add stop button. See Pic 24.
11.3. Creating the white stop.
Still in the Stop Color section, under the RGB tab, type-in:
- R: 255
- G: 255
- B: 255
- A: 255
- RGBA: ffffffff
Then click the Add stop button. See Pic 25.
11.4. Deleting stops.
Still in the The Gradient editor window, check the drop-down menu for stops other than those mentioned in Step 11.2 and Step 11.3.
To delete those extra stops, click that extra stop in the drop-down menu. Then click the Delete stop button. See Pic 26.
You should have only two stops in the drop-down menu by the end of this step. See Pic 27.
The Gradient editor window can be closed when done.
To convert colors, see here:
Color converter - HEX to RGB and rgb to hex color converter
(http://www.yellowpipe.com/yis/tools/hex-to-rgb/color-converter.php/)
11.5. Take note that we want the color to come from only the fill and that nothing comes from the stroke (outline).
Go to the Stroke paint tab and make sure the No paint icon is selected.
12. About the horizontal line mentioned in Step 11, see Pic 28.
If you don't see the line, make sure to select the Rectangle tool icon, see Pic 20, then click Rectangle-1.
The horizontal line (gradient line?) is used to control the direction of the gradient. Move the handles and you move the direction of the gradient.
Click-hold-drag the small square handle (start of linear gradient) of the horizontal line to the upper-left-hand side of the square.
Click-hold-drag the small circle handle (end of linear gradient) of the horizontal line to the lower-right-hand side of the square.
Move the handles around to get the gradient effect you want. Just switch the handles around if your handles do not match mine like in Pic 29. Or feel free to do it anyway you like :)
Pic 28 - Refer to Step 12. The horizontal line at the center of Rectangle-1 as mentioned in Step 11.1. The blue, circular shape you see in the screenshot is to demonstrate the
opacity of the Polaroid frame.
13. Creating the photo area.
A new rectangle, namely Rectangle-2, will be created on top of Rectangle-1. See Pic 31.
Using Rectangle-2 as a "cookie cutter", a hole will be cut out in Rectangle-1.
The hole will be the photo area.
13.1. Click the Rectangle tool icon, see Pic 20.
Create Rectangle-2 on top of Rectangle-1.
In the Controls bar, set the dimensions of Rectangle-2 as, see Pic 30:
- X: 0.187 in
- Y: 1.063 in
- W: 3.625 in
- H: 2.875 in
Change the color of Rectangle-2 for better contrast if you need to. See Pic 31.
Pic 31 - Refer to Step 13.1. Rectangle-2 is the "cookie cutter". Rectangle-1 is the Polaroid frame. The hole is the photo area.
13.2. Creating a hole the size of the photo area.
Select both rectangles either by
- Ctrl+A or
- click-hold-drag and select the whole canvas or
- press the Shift button to multiple-select.
Go to Path > Difference. See Pic 32.
A cut will be made instantaneously. See Pic 33.
14. Creating the drop shadow.
14.1. Take note that the Polaroid frame and the drop shadow will be automatically combined together permanently. It might be a good idea to make a duplicate of the Polaroid frame before proceeding further to avoid having to create the frame repeatedly. See Point D, Point E and Point F.
Right-click the Polaroid frame layer in the Layers (Shift+Ctrl+L) dialog. See Pic 34.
In the right-click menu select Duplicate Current Layer.
A new layer with the word "copy" at the end of the name will be created. See Pic 38.
Click the eye icon to show or hide the layer.
- An opened eye means the layer is visible.
- A closed eye means the layer is invisible.
Click the padlock icon to lock or unlock the layer.
- An unlocked padlock means the layer is editable.
- A locked padlock means the layer is uneditable.
14.2. Go to Filters > Shadows and Glows > Drop Shadow... . See Pic 35.
The Drop Shadow window will appear. See Pic 36.
In the window, set as:
- Blur radius, px: 7.0
- Opacity, %: 80.0
- Horizontal offset, px: 8.0
- Vertical offset, px: 8.0
Put a tick in the Live preview box to see instantly the effect of the drop shadow settings. Then click the Apply button to apply the drop shadow effect.
15. Creating the secondary frame (the frame outside the Polaroid frame).
15.1. Create a new layer for the secondary frame. See Step 10.1.
In the Add Layer window, see Pic 37:
- Name the layer as outside Polaroid frame in the Layer name field.
- Make sure the new layer is Below current in the Position field.
At the moment this is the order of the layers in the Layers (Shift+Ctrl+L) dialog, see Pic 38:
- Polaroid frame copy
- Polaroid frame
- outside Polaroid frame
- Background
The layers can be rearranged by being raised or lowered using the buttons at the bottom of the Layers (Shift+Ctrl+L) dialog.
15.2. Create a new rectangle, namely Rectangle-3, on the outside Polaroid frame layer.
Using the Controls bar, make Rectangle-3 to this size, see Pic 39:
- W: 5.000 in
- H: 5.125 in
15.3. To center Rectangle-3 on the canvas, go to Object > Align and Distribute... . See Pic 40.
The Align and Distribute (Ctrl+Shift+A) dialog will appear on the right-hand side of the Inkscape window.
Select everything on the canvas.
In the Align and Distribute (Ctrl+Shift+A) dialog, under the Align section, see Pic 41:
(i) Relative to:
(ii) click the Center on vertical axis icon
(iii) click the Center on horizontal axis icon
15.4. Changing the color and opacity of Rectangle-3.
Right-click Rectangle-3. In the right-click menu click the the Fill and Stroke. See Step 11 and Pic 22.
In the Fill and Stroke (Ctrl+Shift+F) window, on the Fill tab, make sure to select the Flat color icon. See Pic 42.
In the Flat color section, on the RGB tab type-in:
- R: 255
- G: 255
- B: 255
- A: 90
- RGBA: ffffff5a
15.5. The photo area needs to be cutout, again, this time for Rectangle-3.
Simply repeat Step 13 because this step is similar to that step.
Change the colors of Rectangle-2 for better contrast if you need to.
Press the Shift button to multiple-select Rectangle-3 and Rectangle-2.
By the end of this step the frame will look something like Pic 43.
16. Enlarging the canvas to include Rectangle-3.
Click Rectangle-3.
Go to File > Document Properties... . See Pic 8.
The Document Properties (Ctrl+Shift+D) window will appear. See Pic 44.
On the Page tab, under the Custom size section, expand the Resize page to content... by clicking on the small triangle beside it.
Click the Resize page to drawing or selection button.
After clicking, the canvas size will automatically change to:
- Width: 5.00 in
- Height: 5.12 in
Close the Document Properties (Ctrl+Shift+D) window.
17. Placing the caption.
17.1. Just so we don't mess up anything in case something goes wrong, we will give the caption its very own layer. We will put the caption layer on the topmost of the layers.
Click the Polaroid frame layer in the Layers (Shift+Ctrl+L) dialog.
Then go to Layer > Add Layer... . See Pic 17.
The Add Layer window will appear.
In the window, see Pic 45:
- Layer name: Caption
- Position: Above current
The arrangement of layers in the Layers (Shift+Ctrl+L) dialog at the moment is shown in Pic 46.
17.2. To add the text, click the Text tool icon, see Pic 47, which is in the left-hand side toolbar.
=======
Update: 20 Syawal 1433H / 6 Sep 2012, Ju.
17. Click the cursor on the canvas to add text. Then type-in/paste your text.=======
Do not click-hold-drag as a way to add text. See Note-4.
Source: Ubuntu Digest: How to setup the Squiggle browser + add an underline in Inkscape
(http://ubuntudigest.blogspot.com/2012/08/how-to-setup-squiggle-browser-add.html)
The Controls bar will turn into the text-formatting toolbar where you can change the properties of the text.
Adjust the text properties (
I used, see Pic 47:
- Font: Freestyle Script
- Size: 40
- Alignment: Align left
- Font color: black
To edit the text, you can also go to Text > Text and Font... . See Pic 49.
The Text and Font (Ctrl+Shift+T) window will appear. See Pic 50.
17.3. Changing the font color.
Method 1
(i) Using the Text tool, highlight the text.
(ii) At the bottom of the Inkscape window, right-click the color you want then select Set fill. See Pic 51.
If you want to give color to the outline of the text, select Set stroke instead.
Method 2
You can also use the Fill and Stroke (Ctrl+Shift+F) dialog. See Pic 23.
Go to the Fill tab to set the fill color.
Go to the Stroke tab to set the outline color.
18. A layer specially for the photo.
Method 1
In the Layers (Ctrl+Shift+L) dialog, click the Background layer to activate it (make it the current layer).
Then go to Layer > Add Layer... . See Pic 18.
In the Add Layer window, see Pic 52:
- Layer name: Photo here
- Position: Above current
This should be the final arrangement of the layers in the Layers (Ctrl+Shift+L) dialog, see Pic 53:
- Caption
- Polaroid frame copy
- Polaroid frame
- outside Polaroid frame
- Photo here
- Background
Method 2
If you do not want an extra layer, you can rename the Background layer to Photo here layer instead.
Simply click the layer's name in the Layers (Ctrl+Shift+L) dialog and rename.
Part C: How to use the frame
A. Importing a photo.
A.1. Click the Photo here layer in the Layers (Ctrl+Shift+L) dialog to activate it.
A.2. Go to File > Import... . See Pic 54.
The Select file to import window will appear. See Pic 55.
In the window, locate the photo then click the Open button.
Similarly you can simply drag-and-drop the photo onto the canvas.
In my case, the jpeg GDK pixbuf Input window appeared. See Pic 56.
For the:
- Link or embed image: i chose embed.
Depending on the photo size, the importing process might take a few minutes.
A.3. Once the photo is on the canvas, to resize the photo proportionally, press the Ctrl button, then click-hold-drag one of the handles of the photo to resize.
Pressing the Shift button will resize the photo along the axis corresponding to that particular handle.
B. To edit the caption, click the Text tool icon then click the text field on the canvas. See Step 17.2.
C. To save the file in another format (PNG).
C.1. When you are done editing and ready to export your work, go to File > Export Bitmap... . See Pic 57.
The Export Bitmap (Ctrl+Shift+E) window will appear. See Pic 58.
C.2. In the Export Bitmap (Ctrl+Shift+E) window:
(i) under the Export area section, click the Page button. See Pic 58.
Regarding the:
- Page button -- exports according to the canvas size.
- Drawing button -- exports everything inside and outside the canvas area.
- Selection button -- exports according to the size of the selected object on the canvas
- Custom button
(ii) Under the Bitmap size section, increase or decrease the size of the resulting document if you need to. Otherwise proceed straight to Step C.2.iii.
(iii) Under the Filename section, click the Browse button. See Pic 58.
The Select a filename for exporting window will appear. See Pic 59.
In the window, give the file a name and location. Then click the Save button. The window will disappear.
(iv) Then click the Export button. See Pic 59.
The file will be saved using the PNG format.
D. To save the Polaroid frame + drop shadow + outside Polaroid frame. The result will look something like Pic 1.
D.1. Make sure at least the:
- Caption layer,
- Polaroid frame layer,
- outside Polaroid frame and
- Photo here layer
D.2. Then follow Step C.
In Step C.2.iii, click the Page button.
E. To save the Polaroid frame + drop shadow -- outside Polaroid frame. The result will look something like Pic 2.
E.1. Make sure at least the:
- Caption layer,
- Polaroid frame layer and
- Photo here layer
E.2. Activate the Polaroid frame layer.
On the canvas, select the Polaroid frame.
E.3. Then follow Step C.
In Step C.2.iii, click the Selection button.
F. To save the Polaroid frame -- drop shadow -- outside Polaroid frame. The result will look something like Pic 3.
F.1. Make sure at least the:
- Caption layer,
- Polaroid frame copy layer and
- Photo here layer
F.2. Activate the Polaroid frame copy layer.
On the canvas, select the Polaroid frame.
F.3. Then follow Step C.
In Step C.2.iii, click the Selection button.
Wassalam.
Subscribe to:
Posts (Atom)