P: 15th April 2015, We / 26 Jamadilakhir 1436H, Kh. [Ubuntu 14.04]
U: 15th April 2015, We / 26 Jamadilakhir 1436H, Kh. [Ubuntu 14.04]

Assalamualaikum warahmatullah.
Some things in this post:
Keyboard input for Japanese Hiragana and Chinese Pinyin
http://ubuntudigest.blogspot.com/2012/09/keyboard-input-for-japanese-hiragana.html
... have changed since last. Instead of fixing and correcting here and there to update that old post, I'll leave the post as it is and incorporate those modifications in this post. Activities in this post were performed on Ubuntu 14.04 Trusty Tahr. See Pic 2.
There are 5 parts to this post:
- Part A: Text Entry package
- Part B: Setup
- Part C: Testing
- Part D: Other input sources
- Part E: What is...

Pic 2 - Ubuntu 14.04 LTS.
Part A: Text Entry package
I'm not sure when or why i had this package installed.
If you already have this package installed, skip ahead to Part B.
1. Run Ubuntu Software Center.
i. Click the Dash Home icon in the Launcher.
ii. In the search field, type in: ubuntu software center.
iii. In the list of filtered results, click the Ubuntu Software Center icon.
See Pic 3.
The loaded Ubuntu Software Center will look something like Pic 4.

Pic 3 - Ubuntu Software Center in the list of filtered Applications.

Pic 4 - The Ubuntu Software Center, loaded.

Pic 5 - The Ubuntu Software Center version.
2. Search for the package.
In the search field of Ubuntu Software Center, type in: text entry.
The list will auto-filter.
See Pic 6.

Pic 6 - Searching for the Text Entry package in Ubuntu Software Center.
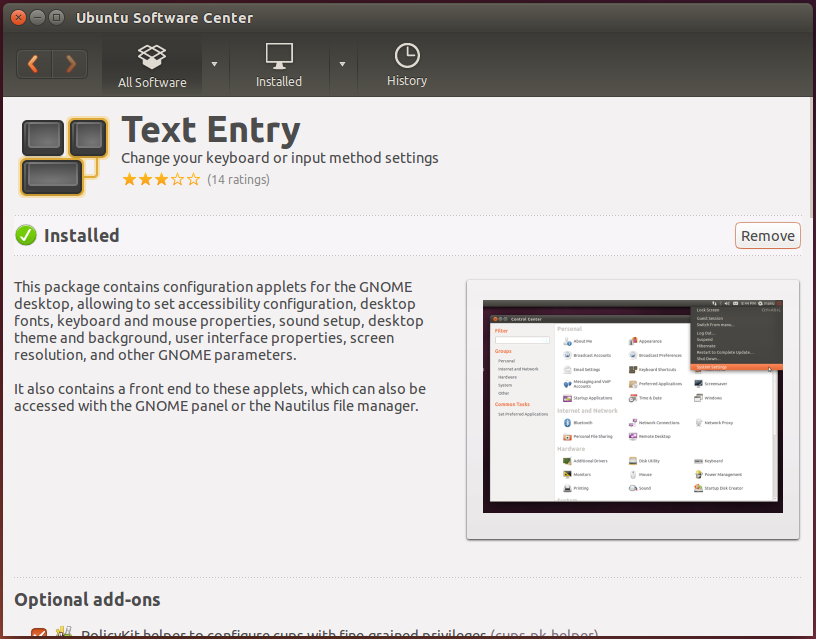
Pic 7 - Package description for the Text Entry package.
3. Install the package.
i. In the list of auto-filtered packages, click the package:
Text EntrySee Pic 6.
Change your keyboard or input method settings
ii. Then, either:
(a) click the Install button to straight-away install the package. Or,
(b) click the More Info button to read the package description and/or install optional add-ons. See Pic 7. Later, click the Install button.
iii. In the Authenticate dialog box, type-in your password in the password field, then click the Authenticate button. See Pic 8.
Once installed, the Install button will change into the Remove button.
You can close Ubuntu Software Center after installation is completed.

Pic 8 - The Authenticate dialog box.
Part B: Setup
4. Running the program that manages the text input source.
i. Click the Dash Home icon in the Launcher.
ii. In the search field, type in: text entry.
iii. Click the Text Entry icon in the filtered results.
See Pic 9.
The Text Entry dialog box will appear. See Pic 10.

Pic 9 - Starting Text Entry.

Pic 10 - The Text Entry dialog box.
5. Adding a new input source.
In the Text Entry dialog box:
i. Click the + (plus) button. The Choose an input source dialog box will appear.
ii. In the Choose an input source dialog box, scroll to and click: Japanese (Anthy).
iii. Then click the Add button.
See Pic 11.
The Input sources to use in the Text Entry dialog box will list the newly added input source. See Pic 12.

Pic 11 - Adding the new input source.

Pic 12 - The Japanese (Anthy) input source added to the list in the Text Entry dialog box.
6. This step is just to show you the 'Hiragana part' about the newly added input source.
In the Text Entry dialog box:
i. Select the Japanese (Anthy) input source.
ii. At the bottom of the Input sources to use list, click the 'screwdriver and spanner' icon. See Pic 13.
The Setup - IBus-Anthy dialog box will appear. See Pic 14.
In the Setup - IBus-Anthy dialog box, under the General tab, in the Initial Setting section, you will see: Input Mode: Hiragana. That's what i wanted to show. You can now close this dialog box.

Pic 13 - The 'screwdriver and spanner' icon in the Text Entry dialog box. It's besides the 'keyboard' icon.

Pic 14 - The Setup - IBus-Anthy dialog box.
7. Switching between input sources.
You can switch between input sources using either (a) the menu bar, or (b) keyboard shortcuts.
You don't actually have to choose between (a) or (b). You can use both -- display the input source in menu bar and change between input sources using the keyboard shortcuts.
(a) Menu bar.
In the Text Entry dialog box, at the bottom left, put a tick in the Show current input source in the menu bar tick-box. See Pic 15.
Instantly you will see a change in the menu bar. See Pic 16 (without tick), and Pic 17 (with tick).
Later when you need to switch between input sources, simply click the Text Entry shortcut in the menu bar and select the input source of your choice. See Pic 18.

Pic 15 - The Show current input source in the menu bar tick-box, from the Text Entry dialog box.

Pic 16 - The Text Entry shortcut is absent in the Menu bar because a tick is absent in the Show current input source in the menu bar tick-box.

Pic 17 - The Text Entry shortcut is present in the Menu bar because a tick is present in the Show current input source in the menu bar tick-box.
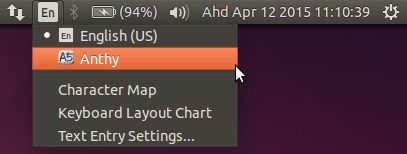
Pic 18 - The input sources listed under the Text Entry shortcut in the menu bar.
(b) Keyboard shortcuts.
You have to know the keyboard shortcuts which are listed on the right of the Text Entry dialog box. See Pic 19. You can change these shortcuts if you have to.
The Super key is the keyboard key with the Windows logo... at least it is on mine :)
Later when you need to switch between input sources, simply press the according keyboard keys sequence.

Pic 19 - Keyboard shortcuts to switch between input sources, from the Text Entry dialog box.
You can now close the Text Entry dialog box.
Part C: Testing
This part is to test the newly added input source.
If setting-up is all you need and you've completed Part B, you can safely skip the rest of this post.
At the same time carrying out the steps in this part, do refer to Vid 1.
8. Open a text editor.
I use gedit.

Pic 20 - The gedit version.
9. Change the input source to: Japanese (Anthy).
If you seem lost, see Step 7 on how to setup and/or change the input source.
10. In the text editor, type-in this romaji:
hontouni
If you want to accept the hiragana (ほんとうに), press the Enter key.
If you want to change the newly typed text to kanji (本当に), press the Space bar key once.
If you want to change the newly typed text:
i - press the Space bar key twice,
ii - select the entry you want, then
iii - after the changes are complete, press the Enter key.
After you are done typing, remember to change the current input source back to your usual input source. :)
Part D: Other input sources
11. These are the other input sources setup on my laptop:
(a) Arabic (qwerty/digits)
See Pic 21.
This i use for both Arabic and Jawi.

Pic 21 - The Arabic (qwerty/digits) input source.
(b) Chinese (Pinyin)
See Pic 22.

Pic 22 - The Chinese (Pinyin) input source.
12. Rearranging the input sources.
In the Text Entry dialog box, use the 'up-down arrowheads' icon to rearrange the input sources. See Pic 23.
The order in the menu bar (see Pic 25) will automatically follow the order in the Text Entry dialog box (see Pic 24).

Pic 23 - The 'up-down arrowheads' icon in the Text Entry dialog box.

Pic 24 - The rearranged order of input sources in the Text Entry dialog box.

Pic 25 - The rearranged order of input sources in the menu bar.
Part E: What is...
(a) What is Anthy?
The mention of Anthy (in Step 5.ii of this post) started way back in the older post.
Anthy
http://en.wikipedia.org/wiki/Anthy
(b) What is "hontouni"?
The romaji hontouni was mentioned in Pic 1 and Step 10 of this post.
For the meaning of the word, go here:
- http://jisho.org/words?jap=本当に;dict=edict
- http://beta.jisho.org/word/本当に
For a list of sentences using the word, go here:
http://jisho.org/sentences?jap=本当に
Thanks to my brother for suggesting these websites/webpages:
- Denshi Jisho — Online Japanese dictionary
http://jisho.org/
- What is On-reading and Kun-reading?
http://japanese.about.com/library/blqow43.htm
- How do you know when to use On-reading and Kun-reading?
http://japanese.about.com/library/blqow44.htm
Alhamdulillah.


