Thursday, April 27, 2017

File `etoolbox.sty' not found. ^^M

C: 5th February 2017M, Sun. / 9 Jamadilawal 1438H, Mon. [Ubuntu 16.04]
P: 27th April 2017M, Thu. / 1 Syaaban 1438H, Fri. [Ubuntu 16.04]
U:

Assalamualaikum. After 'the move', with the new system in place and everything a clean install, this is the second noticeable problem i came across. What happened was, i tried to compile a LaTeX document in Kile and was issued this error, and see Pic 1:
./pantun.tex:53:File `etoolbox.sty' not found. ^^M

Pic 1 - The etoolbox error.


Read about 'the move', here:
The move to Ubuntu 16.04
http://ubuntudigest.blogspot.my/2016/12/the-move-to-ubuntu-1604.html

Read the definition of clean install, here:
http://lookup.computerlanguage.com/host_app/search?cid=C999999&term=clean+install

It seems someone else faced the same LaTeX build/compile error, which also happened after upgrading their Ubuntu system:
TeX problem
https://ubuntuforums.org/showthread.php?t=2349984
In that thread, someone mentioned texlive-latex-extra package.

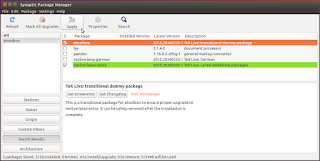
A search in Ubuntu Software turned-up no etoolbox (see Pic 2) nor texlive package (see Pic 3). Weird, because Ubuntu Software is where you go to to find and fulfill all your Ubuntu needs. And it's where i, previously (before 'the move'), find my LaTeX-related packages.

Pic 2 - Ubuntu Software. No etoolbox package.


Pic 3 - Ubuntu Software. No texlive package.


If
Androidians find their apps in the Play Store, and
Appleians find their supply in iTunes, then
Ubuntunians find theirs in Ubuntu Software.

If the package is not in Ubuntu Software, then where is it?
-- The second place to go to is Synaptic Package Manager.

This post is divided into four parts:
Part A: Install Synaptic Package Manager
Part B: Install etoolbox
Part C: Test the installation
Part D: Note


Part A: Install Synaptic Package Manager

In previous versions of Ubuntu, Synaptic Package Manager came installed along with the Ubuntu system. But starting from whatnumber, Synaptic had to be installed on your own.

Note for 11.10 release and above

Synaptic is no longer installed by default in Ubuntu 11.10, however it is still useful in some situations.

Source: SynapticHowto
https://help.ubuntu.com/community/SynapticHowto

If you already have Synaptic Package Manager present in your system, skip this part and proceed to the next part.

If you don't have Synaptic Package Manager present in your system, proceed with this part.


1. Load Ubuntu Software.


1. Click the Dash icon in the Launcher.


2. In the search field, type in: ubuntu software


3. Click the Ubuntu Software icon.

See Pic 4.

The loaded Ubuntu Software window looks something like Pic 5.

Pic 4 - Launching Ubuntu Software.


Pic 5 - Ubuntu Software, loaded.
(Two separate screenshots were stitched to make this picture.)


Pic 6 - The Ubuntu Software version.


Read about launch, load, here:
never say
http://lookup.computerlanguage.com/host_app/search?cid=C999999&def=6e6576657220736179.htm

Read about dialog box, here:
http://lookup.computerlanguage.com/host_app/search?cid=C999999&term=dialog+box

Read about window, here:
http://lookup.computerlanguage.com/host_app/search?cid=C999999&term=window


2. Search for the Synaptic Package Manager package.

In Ubuntu Software, in the search field, type in: synaptic

See Pic 7.

Pic 7 - Ubuntu Software. Searching for the Synaptic Package Manager package.


3. Install the Synaptic Package Manager package.


1. To read the package description, simply click the package in the filtered list. See Pic 8.


2. To install the package, click the Install button. See Pic 7 and Pic 8.


3. The Authenticate dialog box will appear. Fill-in your password in the Password field, then click the Authenticate button. See Pic 9.

Pic 8 - Ubuntu Software. More info about the Synaptic Package Manager package.


Pic 9 - The Authenticate dialog box. Authenticate before installing the package.


4. Close Ubuntu Software.

Once the installation is completed, you can close Ubuntu Software.


Part B: Install etoolbox

5. Load Synaptic Package Manager.


1. Click the Dash icon in the Launcher.


2. In the search field, type in: synaptic


3. Click the Synaptic Package Manager icon.

See Pic 10.


4. The Authenticate dialog box will appear. Fill-in your password in the Password field, then click the Authenticate button. See Pic 11.

The loaded Synaptic Package Manager window looks something like Pic 12.

Pic 10 - Launching Synaptic Package Manager.


Pic 11 - The Authenticate dialog box for Synaptic Package Manager.


Pic 12 - Synaptic Package Manager, loaded.


Pic 13 - The Synaptic Package Manager version.


6. Search for the etoolbox package.


1. In the Synaptic Package Manager window, click the Search button.

The Find dialog box will appear.


2. In the Find dialog box,

i. in the Search field, type in: etoolbox

ii. In the Look in list, choose: Description and Name

iii. Then click the Search button.

See Pic 14.

The list will be updated with the search results.

Pic 14 - Synaptic Package Manager. Searching for the etoolbox package.


7. Install the etoolbox package.


1. In the Synaptic Package Manager window, in the All section, click etoolbox.


2. In the Package column, click the etoolbox package.

The package description will be displayed in the right-bottommost section of the window.


3. In the S column, click the box for the etoolbox package.

A menu will appear.


4. In the menu, click the Mark for Installation option. See Pic 15.

The synaptic dialog box will appear. See Pic 16.

Pic 15 - Synaptic Package Manager. Marking the etoolbox package for installation.


5. In the synaptic dialog box, click the Mark button. See Pic 16.

The list of marked packages in the Synaptic Package Manager window will be updated. See Pic 17.

Pic 16 - The synaptic dialog box. Marking additional packages.


6. In the Synaptic Package Manager window, click the Apply button. See Pic 17.

The Summary dialog box will appear. See Pic 18.

Pic 17 - Synaptic Package Manager. The updated list of marked packages for installation.


7. In the Summary dialog box, click the Apply button. See Pic 18.

The Downloading Package Files dialog box will appear. See Pic 19.

Allow some time for the package to be downloaded depending on your Internet speed, and installed.

Installed packages have a green box in the S column. See Pic 20.

Pic 18 - The Summary dialog box.


Pic 19 - The Downloading Package Files dialog box.


Pic 20 - Synaptic Package Manager. The marked packages are now installed.


8. Close Synaptic Package Manager.

Once the installation is completed, you can close Synaptic Package Manager.


Part C: Test the installation

9. Load your LaTeX editor.

I use Kile.

In case you want to use Kile but can't find it in your system, then you will need to install Kile first. Kile doesn't come installed with Ubuntu. You will have to install it yourself.


1. Click the Dash icon in the Launcher.


2. In the search field, type in: kile


3. Click the Kile icon.

See Pic 21.

The loaded Kile window looks something like Pic 22.

Pic 21 - Launching Kile.


Pic 22 - Kile, loaded.


Pic 23 - The Kile version.


10. Compile your document.


1. Load your document.


2. Compile your document. See Pic 24.

I use XeLaTeX.

The etoolbox error should be gone and your document compiled successfully. See Pic 25.

Pic 24 - Kile. Compiling the document.


Pic 25 - The etoolbox error is gone.


Part D: Note

Notice the [XeLaTeX] failed to start 'error' in Pic 1 and Pic 25?

This is a separate problem altogether. At this point of this post, while trying to document the problem (and at the same time troubleshoot it), i somehow stumbled upon the solution. Although the 'error' is solved and now gone, I'm not going to re-do the pictures, so i will leave things as it is.


Alhamdulillah.

Tuesday, December 27, 2016

The move to Ubuntu 16.04

C: 17th November 2016M, Th / 17 Safar 1438H, Th. [Ubuntu 16.04]
P: 27th December 2016M, Tu / 27 Rabiulawal 1438H, Tu. [Ubuntu 16.04]
U:

Pic 1 - Ubuntu 16.04. My current system, after the clean install.


Assalamualaikum. Somewhere in August i did an in-place upgrade (see Pic 2) for the operating system on my laptop, from Ubuntu 14.04 Trusty Tahr (see Pic 3) to Ubuntu 16.04 LTS Xenial Xerus (see Pic 4).

Pic 2 - Upgrade option.


Pic 3 - Ubuntu 14.04. My previous system.


Pic 4 - Ubuntu 16.04. My 'new' system, after the in-place upgrade.


Read about in-place upgrade, here:
http://lookup.computerlanguage.com/host_app/search?cid=C999999&term=in-place+upgrade

At first the new system (Pic 4) was okay, although there was both Ubuntu Software Center (from Ubuntu 14.04) and Ubuntu Software (from Ubuntu 16.04) appearing at the same time in the list of Applications. Sorry, no screenshot. :(

The last time the system was running fine before any problem started, what i did, i think, was, i switched the laptop to Suspend mode, then left it like that until the battery ran out a few days later. The next time i started-up the system, that was when the first problem started. And it wasn't just Ubuntu that had problems, somehow Windows 10 did too.

The first problem. The first problem was with the display. Everything on the screen was big, as if a small-sized digital photo was stretched to become the wallpaper for a big-sized digital screen, minus some pixelation. Imagine the screen resolution is best at 1366×768 pixels, but the output resolution is 1024×768 pixels. Later on the problems alternated --depending on which problem i tried to solve-- between the display problem and the login-screen loop problem.

The display problem came from the absence of the graphics driver. But...! Install a driver, any driver, the right driver even, and the login-screen loop problem surfaces at the next system startup. To be absolutely sure i got the correct driver i downloaded the specific driver from NVIDIA's website but no matter which graphics driver was installed it would lead to the login-screen loop.

The second problem. The second problem was the login-screen loop where the login screen would go into a loop; from the login screen (key-in the password then press the Enter keyboard key), a flash of black screen, then taken back to the login screen.

If i installed a driver for graphics, the login-screen loop problem will surface at the next system startup, and will remain for as long as the driver is present in the system. If i removed the graphics driver, login was okay and that i could login, but the display was kind of 'zoomed-in', and sometimes the system would hang after some time for no reason and required a hard restart.

Read about hard restart, here:
https://www.techopedia.com/definition/7520/hard-reboot

Solution? After trying out a few online remedies and combinations, nothing seemed to solve the problems. The foolproof way to make the problems go away is to do a clean install. It was high time for some digital cleaning anyway. Data from Ubuntu and Windows were backed-up on an external hard disk. Abang told to start with Windows, so i started to troubleshoot Windows and later Ubuntu.

Read about clean install, here:
https://www.techopedia.com/definition/3330/clean-install

Windows 10. With Windows, i did a reset where i chose to Keep my files. See Pic 5. The reset process was pretty simple and straightforward. Customizing afterwards took some time.

Pic 5 - Resetting Windows 10 on my laptop and at the same time retaining my personal files from the wipe.


Read more about resetting Windows 10, here:
Everything You Need to Know About “Reset This PC” in Windows 8 and 10
http://www.howtogeek.com/132428/everything-you-need-to-know-about-refreshing-and-resetting-your-windows-8-pc/

Ubuntu 16.04. With Ubuntu, i did a clean install using a pen drive as a startup disk. The startup disk was created on the 'in-place' Ubuntu 16.04 system using the Startup Disk Creator app (see Pic 6 and 7). The process was a breeze, other than setting the disk partitioning; boot, swap and whatever else. I'll need to read-up on that. After the clean install was completed, the pen drive was formated using the Disks app (see Pic 8, 9, and 10).

Pic 6 - The Startup Disk Creator icon.


Pic 7 - The Startup Disk Creator app.


Pic 8 - The Disks icon.


Pic 9 - The Disks app.


Pic 10 - The About for the Disks app.


Creating a startup disk and installing from a pen drive is something i have never done before. What i usually do is burn the ISO image to a DVD disc then install. But this time i couldn't find an empty disc. There were empty CDs but no empty DVDs.

Read about disC and disK, here:
What‘s the difference between a "disc" and a "disk?"
https://support.apple.com/en-us/HT201697
(Basically, DIS-with-a-C are round, and DIS-with-a-K are magnetic.)

Now. Everything seems to be running as supposed to, except for a problem with a Ubuntu font, specifically Ubuntu Light.

Alhamdulillah.

Thursday, August 13, 2015

[LibreOffice Calc] One word, one cell

C: 29th July 2015M, We / 13 Syawal 1436H, We. [Ubuntu 14.04]
P: 13th Aug 2015M, Th / 28 Syawal 1436H, Th. [Ubuntu 14.04]
U:


Assalamualaikum warahmatullah. Imagine there are strings and strings of words. In LibreOffice Calc, what i want is for:
(i) one word to go into one cell,
(ii) the word-containing cells to be arranged vertically (instead of horizontally), and
(iii) those word-containing cells to take-up only one column (instead of multiple columns).

That arrangement is useful for word-by-word translating exercise which at the same time preserves the word sequence. So you can either read left-to-right or top-to-bottom. :)

There are three parts to this post:
- Part A: Copy-Paste from source to LibreOffice Calc
- Part B: Transpose in LibreOffice Calc
- Part C: The finished work

If you want to look around, start with Part C.


Part A: Copy-Paste from source to LibreOffice Calc

See Vid 1 which demonstrates Part A and Part B of this post.

Vid 1 - Overviews Part A and Part B of this post.


1. Select the chunks of text. See Pic 1.

Here's the link to the text in Pic 1:
https://www.facebook.com/zahazanmohamed/photos/10153016171783341/

Pic 1 - Screenshot taken at 90% zoom.
Left: The text.
Right: The text, selected.


2. Press the Ctrl+C keyboard keys to copy the chunk of text.


3. Run LibreOffice Calc.

i. Click the Dash Home icon in the Launcher.
ii. In the search field, type in: calc.
iii. Click the LibreOffice Calc icon.

See Pic 2.

The LibreOffice Calc window will appear. See Pic 3.

Pic 2 - Starting LibreOffice Calc.


Pic 3 - The LibreOffice Calc window once loaded.


Pic 4 - The LibreOffice version.


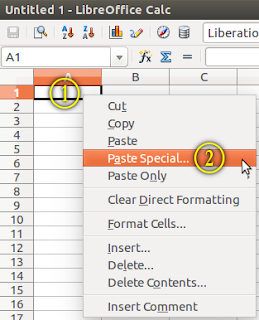
4. Right-click a cell.

In the right-click menu, left click Paste Special... .

See Pic 5.

Pic 5 - The right-click menu.


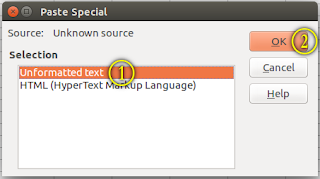
5. In the Paste Special dialog box:
(i) select Unformatted text, then
(ii) click the OK button.

See Pic 6.

Pic 6 - The Paste Special dialog box.


6. In the Text Import dialog box:
(i) in the Separator Options section, select Separated by,
(ii) put a tick mark in the appropriate box (in my case: Space), and
(iii) click the OK button.

See Pic 7.

See how the imported text looks in Pic 8.

Pic 7 - The Text Import dialog box.


Pic 8 - The imported text.


Part B: Transpose in LibreOffice Calc

Credit for the Transpose info:
http://www.excelforum.com/excel-general/674001-excel-importing-text-file-as-one-long-row.html#post2052280


7. Add a new sheet by clicking the green plus icon. See Pic 9.

The icon is at the bottom of the LibreOffice Calc window, near to the left. See Pic 3.

Pic 9 - The green plus icon icon.


Vid 2 - Shows Step 8 to Step 12.


8. Select the first row of text from Sheet1 (the sheet you used in Step 4).


9. Press the Ctrl+X keyboard keys to cut the row of selected text.

Or if you want to keep the original, you can use Ctrl+C to copy the row of selected text. As i probably don't need the original, i cut the text straightaway.


10. Go to Sheet2 (the sheet you added in Step 7).


11. Right-click a cell where you want the text to start vertically.

In the right-click menu, left click Paste Special... .

See Pic 5.

In my case, i want it to start from cell A2.


12. In the Paste Special dialog box:
(i) in the Options section, put a tick mark in the Transpose box
(ii) then click the OK button.

See Pic 10.

The selected text in Step 8 will be arranged vertically in column A. See Pic 11.

Pic 10 - The Paste Special dialog box.


Pic 11 - The transposed text.


13. Repeat Step 8 to Step 12 for the rest of the text.

Sorry, i don't know how to do it in one go, or automatedly.


Part C: The finished work

The finished work in LibreOffice Calc is shown in Pic 12.

One of the page of the finished work is shown in Pic 13.

The whole document is shown in PDF 1.

Pic 12 - Screenshot of the finished work in LibreOffice Calc.
- Column A: #. Item numbering.
- Column B: Bahasa Arab. The Arabic text.
- Column C: Transliterasi. The transliteration.
- Column D: Bahasa Melayu. The Malay translation.
- Column E: Nota. Notes.


Pic 13 - One of the page of the finished work.
The page was converted from PDF to PNG using GIMP.
Refer to PDF 1 for the latest version of the whole document.


PDF 1 - The whole document of the finished work.
Obviously i need to put more effort into my Arabic. (^_^!)


Alhamdulillah.

Wednesday, April 15, 2015

Keyboard input for Japanese Hiragana (Ubuntu 14.04)

C: 10th April 2015, Fr / 20 Jamadilakhir 1436H, Ju. [Ubuntu 14.04]
P: 15th April 2015, We / 26 Jamadilakhir 1436H, Kh. [Ubuntu 14.04]
U: 15th April 2015, We / 26 Jamadilakhir 1436H, Kh. [Ubuntu 14.04]

Pic 1 - Really? Hontouni in hiragana.


Assalamualaikum warahmatullah.

Some things in this post:
Keyboard input for Japanese Hiragana and Chinese Pinyin
http://ubuntudigest.blogspot.com/2012/09/keyboard-input-for-japanese-hiragana.html

... have changed since last. Instead of fixing and correcting here and there to update that old post, I'll leave the post as it is and incorporate those modifications in this post. Activities in this post were performed on Ubuntu 14.04 Trusty Tahr. See Pic 2.

There are 5 parts to this post:
- Part A: Text Entry package
- Part B: Setup
- Part C: Testing
- Part D: Other input sources
- Part E: What is...

Pic 2 - Ubuntu 14.04 LTS.


Part A: Text Entry package

I'm not sure when or why i had this package installed.

If you already have this package installed, skip ahead to Part B.


1. Run Ubuntu Software Center.

i. Click the Dash Home icon in the Launcher.
ii. In the search field, type in: ubuntu software center.
iii. In the list of filtered results, click the Ubuntu Software Center icon.

See Pic 3.

The loaded Ubuntu Software Center will look something like Pic 4.

Pic 3 - Ubuntu Software Center in the list of filtered Applications.


Pic 4 - The Ubuntu Software Center, loaded.


Pic 5 - The Ubuntu Software Center version.


2. Search for the package.

In the search field of Ubuntu Software Center, type in: text entry.

The list will auto-filter.

See Pic 6.

Pic 6 - Searching for the Text Entry package in Ubuntu Software Center.


Pic 7 - Package description for the Text Entry package.


3. Install the package.

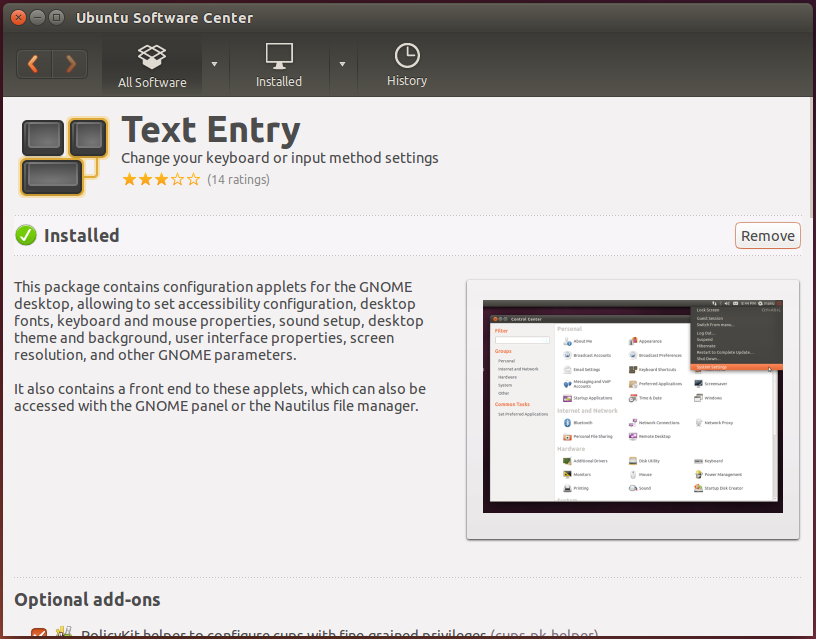
i. In the list of auto-filtered packages, click the package:
Text Entry
Change your keyboard or input method settings
See Pic 6.

ii. Then, either:
(a) click the Install button to straight-away install the package. Or,
(b) click the More Info button to read the package description and/or install optional add-ons. See Pic 7. Later, click the Install button.

iii. In the Authenticate dialog box, type-in your password in the password field, then click the Authenticate button. See Pic 8.

Once installed, the Install button will change into the Remove button.

You can close Ubuntu Software Center after installation is completed.

Pic 8 - The Authenticate dialog box.


Part B: Setup

4. Running the program that manages the text input source.

i. Click the Dash Home icon in the Launcher.
ii. In the search field, type in: text entry.
iii. Click the Text Entry icon in the filtered results.

See Pic 9.

The Text Entry dialog box will appear. See Pic 10.

Pic 9 - Starting Text Entry.


Pic 10 - The Text Entry dialog box.


5. Adding a new input source.

In the Text Entry dialog box:
i. Click the + (plus) button. The Choose an input source dialog box will appear.
ii. In the Choose an input source dialog box, scroll to and click: Japanese (Anthy).
iii. Then click the Add button.

See Pic 11.

The Input sources to use in the Text Entry dialog box will list the newly added input source. See Pic 12.

Pic 11 - Adding the new input source.


Pic 12 - The Japanese (Anthy) input source added to the list in the Text Entry dialog box.


6. This step is just to show you the 'Hiragana part' about the newly added input source.

In the Text Entry dialog box:
i. Select the Japanese (Anthy) input source.
ii. At the bottom of the Input sources to use list, click the 'screwdriver and spanner' icon. See Pic 13.

The Setup - IBus-Anthy dialog box will appear. See Pic 14.

In the Setup - IBus-Anthy dialog box, under the General tab, in the Initial Setting section, you will see: Input Mode: Hiragana. That's what i wanted to show. You can now close this dialog box.

Pic 13 - The 'screwdriver and spanner' icon in the Text Entry dialog box. It's besides the 'keyboard' icon.


Pic 14 - The Setup - IBus-Anthy dialog box.


7. Switching between input sources.

You can switch between input sources using either (a) the menu bar, or (b) keyboard shortcuts.

You don't actually have to choose between (a) or (b). You can use both -- display the input source in menu bar and change between input sources using the keyboard shortcuts.

(a) Menu bar.

In the Text Entry dialog box, at the bottom left, put a tick in the Show current input source in the menu bar tick-box. See Pic 15.

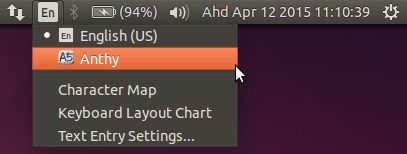
Instantly you will see a change in the menu bar. See Pic 16 (without tick), and Pic 17 (with tick).

Later when you need to switch between input sources, simply click the Text Entry shortcut in the menu bar and select the input source of your choice. See Pic 18.

Pic 15 - The Show current input source in the menu bar tick-box, from the Text Entry dialog box.


Pic 16 - The Text Entry shortcut is absent in the Menu bar because a tick is absent in the Show current input source in the menu bar tick-box.


Pic 17 - The Text Entry shortcut is present in the Menu bar because a tick is present in the Show current input source in the menu bar tick-box.


Pic 18 - The input sources listed under the Text Entry shortcut in the menu bar.


(b) Keyboard shortcuts.

You have to know the keyboard shortcuts which are listed on the right of the Text Entry dialog box. See Pic 19. You can change these shortcuts if you have to.

The Super key is the keyboard key with the Windows logo... at least it is on mine :)

Later when you need to switch between input sources, simply press the according keyboard keys sequence.

Pic 19 - Keyboard shortcuts to switch between input sources, from the Text Entry dialog box.


You can now close the Text Entry dialog box.


Part C: Testing

This part is to test the newly added input source.

If setting-up is all you need and you've completed Part B, you can safely skip the rest of this post.

At the same time carrying out the steps in this part, do refer to Vid 1.

Vid 1 - Trying out hiragana in gedit (a text editor).


8. Open a text editor.

I use gedit.

Pic 20 - The gedit version.


9. Change the input source to: Japanese (Anthy).

If you seem lost, see Step 7 on how to setup and/or change the input source.


10. In the text editor, type-in this romaji:
hontouni

If you want to accept the hiragana (ほんとうに), press the Enter key.

If you want to change the newly typed text to kanji (本当に), press the Space bar key once.

If you want to change the newly typed text:
i - press the Space bar key twice,
ii - select the entry you want, then
iii - after the changes are complete, press the Enter key.

After you are done typing, remember to change the current input source back to your usual input source. :)


Part D: Other input sources

11. These are the other input sources setup on my laptop:

(a) Arabic (qwerty/digits)

See Pic 21.

This i use for both Arabic and Jawi.

Pic 21 - The Arabic (qwerty/digits) input source.


(b) Chinese (Pinyin)

See Pic 22.

Pic 22 - The Chinese (Pinyin) input source.


12. Rearranging the input sources.

In the Text Entry dialog box, use the 'up-down arrowheads' icon to rearrange the input sources. See Pic 23.

The order in the menu bar (see Pic 25) will automatically follow the order in the Text Entry dialog box (see Pic 24).

Pic 23 - The 'up-down arrowheads' icon in the Text Entry dialog box.


Pic 24 - The rearranged order of input sources in the Text Entry dialog box.


Pic 25 - The rearranged order of input sources in the menu bar.


Part E: What is...

(a) What is Anthy?

The mention of Anthy (in Step 5.ii of this post) started way back in the older post.

Anthy
http://en.wikipedia.org/wiki/Anthy


(b) What is "hontouni"?

The romaji hontouni was mentioned in Pic 1 and Step 10 of this post.

For the meaning of the word, go here:
- http://jisho.org/words?jap=本当に;dict=edict
- http://beta.jisho.org/word/本当に

For a list of sentences using the word, go here:
http://jisho.org/sentences?jap=本当に

Thanks to my brother for suggesting these websites/webpages:
- Denshi Jisho — Online Japanese dictionary
http://jisho.org/

- What is On-reading and Kun-reading?
http://japanese.about.com/library/blqow43.htm

- How do you know when to use On-reading and Kun-reading?
http://japanese.about.com/library/blqow44.htm


Alhamdulillah.